Carving The Punkin' Can Be A Load Of Fun!
We have been using this technique for years and now you can find the patterns in the local grocery store. Some can be very very very difficult!!! A jack-o'-lantern, sometimes also spelled Jack O'Lantern, is a pumpkin whose top and stem have been cut out and interior removed, leaving a hollow shell that is then decoratively carved. Jack-o'-lanterns are associated with the holiday Halloween . The term is not particularly common outside North America.
Sections of the pumpkin are cut out to make a design, often depicting a face. A variety of tools may be used to carve and hollow out the gourd, ranging from simple knives and spoons to specialized instruments. Printed stencils can be used as a guide for increasingly complex designs. It is possible to create surprisingly artistic designs, be they simple or intricate in nature. After carving, a light source (traditionally a candle, now often a battery-operated light) is placed inside the pumpkin and the top is put back into place. The light illuminates the design from the inside. Sometimes a chimney is carved in the lid to allow heat to escape.
Traditionally the carved pumpkin would be a face, often with a simple crooked toothed grin. But toward the end of the 20th century, artists began expressing every kind of idea they could imagine on pumpkins. Today, it is common to see portraits of political candidates, celebrities and cartoon characters.
Step #1

Cut Lid or Bottom - Cut a six-sided lid, big enough so you can reach in and clean out all the pumpkin gunk. Angle the Lid Cutter™ Saw or a knife toward the center of the pumpkin to create a ledge that supports the lid.
Do NOT forget the seeds!!
Step #2
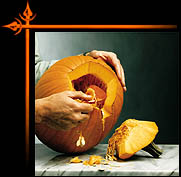 Clean and Scrape = Using the Pumpkin Masters patented Scraper Scoop™ (or a flat-edged ice cream scoop), clean out the seeds and strings. Where you plan to carve, scrape the pumpkin wall until it’s about one inch thick.
Take out the seeds and clean them (or wash them) and spread on a cookie sheet and roast them with seasonings of your choice....
Ingredients:
Pumpkin seeds
3 tablespoons of butter
Salt (OPTIONAL: Add additional spices to the butter mixture. Seasoning salt, garlic pepper and red pepper flakes are my favorites.)
Pre-heat oven to 375 degrees. Separate the seeds as you clean your pumpkin. Wash the seeds well and pat them dry with a paper towel. Leave the seeds to dry for about 10 minutes while you prepare your spread. Melt butter in saucepan or microwave. Add desired spices and salt.
Place aluminum foil over a cookie sheet and spread seeds in a single layer. Pour or brush butter/spice mixture over the seeds evenly. Place in the oven. The seeds will begin to brown after 20-30 minutes. Once they achieve a golden brown complexion they are done.
Step #3

Attach Pattern - Tape or pin the pattern to your pumpkin. If you use pins, place them on the design lines so you don’t end up with holes you don’t want!
Step #4

Transfer Design - Using a Pumpkin Masters poker tool or a push pin, make pinpoint marks 1/16" to 1/8" apart along the design lines. Check to see you have transferred the design completely, then tear the pattern off the pumpkin.
Step #5
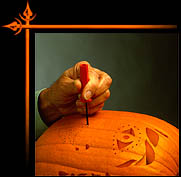
“Saw” Design - Using Pumpkin Masters slender carving saws, saw dot-to-dot using a gentle up and down motion. Easy does it, Pumpkin Picassos!